Dominic Cleal's Blog

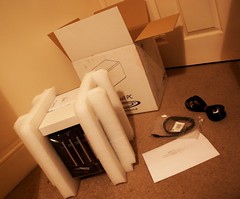
Tranquil PC BBS2 for a home NAS, part 1: unpacking

For years, I've been wishing for a small, low power home NAS to hold of all my data securely. The range of mini-ITX systems has intrigued me, but finding a suitable case that can hold a bunch of disks has been difficult.
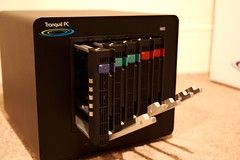
Recently, I ordered a barebones system from Tranquil PC, the BBS2 after a recommendation from Jon Fautley. It's a mini-ITX system inside based on the Intel D945GCLF2 motherboard with a HT-enabled dual core Intel Atom 330 CPU.

The system has five removable drive caddies, some connected to the motherboard, some a fitted Silicon Image SIL3124 RAID card, plus an eSATA port available on the back for further expansion. The model I chose was configured with the eSATA port and three of the drive caddies connected to the RAID card and the other two on the motherboard.

The order from Tranquil PC was straight forward, though as they apparently build them to order, it took about nine working days for the system to arrive (including snow!).

I'd like to run OpenSolaris on the system to get all of the advantages of ZFS: regular, automatic snapshots, NFS and CIFS file sharing and RAIDZ. So far, I've been unsuccessful in trying to use the automated installer as my network didn't support the multicast required for DNS service discovery.

Instead, using these instructions, I easily created a USB stick that the machine could boot from to run the OpenSolaris installer. It's worked perfectly so far and the system's up and running on a test disk.

The next step is to order some HDDs for it to store the data pool on, then begin configuring the system. The drives I have in mind are the Western Digital Caviar "Green" drives, which have a very low power consumption compared to other drives.

Published specifications of WD drives
Drive Read/write consumption Idle consumption Standby consumption Maximum operating temp
WD Caviar Blue 750GB 8.77W 8.40W 0.97W 60°C
WD Caviar Green 1TB 5.4W 2.8W 0.4W 55°C

The main compromise with these drives that may affect this system seems to be the maximum operating temperature. As the system is very compact (much like a Shuttle PC), Jon reported his drive temperatures reaching the high 40s, so the lower max rating is a little concerning. Hopefully the considerably lower power usage reduces the overall cost of the system.

I'll try and add more info about how the machine's set up as I progress with the install and configuration of OpenSolaris 2008.11 in the hope that it helps somebody!

More photos: m0dlx's photostream: BBS2 Home NAS


Other related posts:

BBS2 for a home NAS, part 2: installation and configuration

As mentioned in part one I was hoping to run OpenSolaris on my new Tranquil PC BBS2 server in order to get ZFS for data storage. This opens up a world with automatic, regular snapshots of my data on a solid operating system.

For this server, I chose to use OpenSolaris 2008.11 (known as Indiana) as I might also use it occassionally for a desktop (locally or remotely) in the future.

Initially, I thought I'd try and boot the system from the network as the unit doesn't have a CD/DVD drive. This started off with the automated installer project following this set of instructions from the docs. The first impressions were great, with a simple installadm command to set up the server with DHCP, TFTP and Apache HTTP for serving files.

Unfortunately, it needs working multicast on the network, which isn't something I have functioning here at the moment (plus I was using a VM for the OpenSolaris AI server). I struggled with it for a bit and discovered that there's no support for unicast DNS yet.

At this point, I decided to use a USB stick install as the system appeared to boot from a test DSL USB stick I had lying around (by default, the system seems to boot first to USB, then HDD, then PXE/network). Once I'd gone to buy a 1GB USB stick (the minimum I believe), I used Clay's instructions on an OS 2008.11 VirtualBox VM with the USB stick passed through to the VM. The usbgen and usbcopy utilities from SUNWdistro-const were quick and easy and used the original ISO to write onto the USB key.

OpenSolaris was very easy to get installed and running, booting straight into a GUI, as easy as any Linux distro these days. At this point, the four WD 'Green' 1TB drives arrived, giving me the ability to create a data zpool containing all of the disks. With all four disks, the raw storage capacity is 3.62TB (according to zpool list), which I put into a RAID-Z (like RAID-5) configuration, yielding a usable total of 2.32TB (according to zfs list).

In the last entry, Matt asked whether using the fitted PCI SATA RAID controller (a Silicon Image SIL3124) was a good idea or not. The main issue is with how the RAID ports and disks are configured and secondly, whether the hardware RAID offers the features you need. When you order, there are two options for the layout of disks:

  • Option 3+1: two disks on the motherboard, three disks on the RAID card, eSATA port on the RAID card
  • Option 4+0: one disk on the motherboard, four disks on the RAID card
If you intend to pool all five disks together, then this will be a problem and you'll be forced to use software RAID as the hardware RAID card only covers three or four of the disks. Otherwise, it's feasible to put the OS on the first hard drive and then use the hardware RAID across the remaining three or four disks.

With the power of software RAID nowadays, there's little advantage to be had in using the hardware RAID card (as it's a simple card, with no write-through cache AFAIK) and if anything, you may be limited by not having the data integrity provided by newer generation filesystems such as ZFS (and perhaps btrfs when it arrives).

One occasional problem that I've been experiencing with the BBS2 and its onboard GigE ethernet card (the Realtek RTL8102E) has been prolonged network dropouts. At first, I had problems with my router (some Linksys WGR614) allocating the same IP to the server and another PC. OpenSolaris dropped the rge0 straight into the DUPLICATE state (see ifconfig -a) and it disappeared from the network. However, since I've had a couple of complete dropouts, with the interface simply stopping, no clues in ifconfig, no responses to ARP requests for its IP address and no change when the interface is replumbed.

Jon (who recommended the BBS2) mentioned that the ethernet has problems sometimes with auto-negotiation and forcing it up to 100/full on his network ironed out problems. Unfortunately, this isn't possible with GigE and so I'll continue to troubleshoot this with the switch diagnostics if it happens again.

Update (23/02/09): the network dropouts are continuing, mostly it seems when transferring a lot over data over the interface (e.g. when extracting a large archive onto it). There are no hints on the server that anything's wrong, but it's unable to ping out or reply to pings. No packets are seen through a mirrored switch port.

Update (02/03/09): I've written more about the problem here.

Other related posts:

BBS2 for a home NAS, part 3: sharing configuration

One of the niceties of the OpenSolaris ZFS integration is how easy it was to set up NFS and CIFS network file sharing. I started off with a ZFS dataset layout like this (yeah, yeah, 'tank'):

$ zfs list -r tank
NAME                USED  AVAIL  REFER  MOUNTPOINT
tank                359G  2.32T  26.9K  none
tank/home           359G  2.32T  28.4K  /export/home
tank/home/dominic   359G  2.32T   354G  /export/home/dominic
You can see in the above, the mountpoint of tank/home has been changed (zfs set mountpoint=/export/home tank/home) to replace the default rpool/export/home dataset (which I destroyed). I wanted any dataset under tank/home to be automatically available over NFS, to enable file compression and cross-protocol file locking for CIFS:
$ pfexec zfs set sharenfs=on tank/home
$ pfexec zfs set compression=on tank/home
$ pfexec zfs set nbmand=on tank/home
And then tank/home/dominic will inherit these properties:
$ zfs get sharenfs,compression,nbmand tank/home/dominic
NAME               PROPERTY  VALUE              SOURCE
tank/home/dominic  sharenfs     on                 inherited from tank/home
tank/home/dominic  compression  on                 inherited from tank/home
tank/home/dominic  nbmand       on                 inherited from tank/home
For my Linux desktop, I used autofs to mount the NFS filesystem automatically from the server ("argon") as it was needed. This simply needed two config changes (plus the installation of NFS utils and autofs itself). To /etc/auto.master, I added one line to define this set of automounts:
/home     /etc/auto.home  --timeout=60
And then the referenced /etc/auto.home config looks like:
*        -fstype=nfs,rw,nosuid,soft,intr        argon:/export/home/&
This matches any request for /home/<username> and automounts the NFS share argon:/export/home/<username>.

Lastly, I wanted the files available over CIFS as well. This was simply a matter of following these docs to get SMB connectivity working (with the exception of enabling the svc:/network/smb/server:default service, no need to import it).

Once the SMB server was running, I used the autohome share feature in Solaris to make user directories available as users identify and login to the server with their username/password. To do this, /etc/smbautohome simply contains:

*       /export/home/&

Amazingly, that's about the extent of the configuration on the system!

Other related posts:

Archives